Last summer, I met a new client who told me an old story. She had stuff in a box and didn’t want to move that box around anymore. She wanted to do something with the contents of that box that she could enjoy and that would honor the former owners of the artifacts in the box. Does that sound familiar?

1910 Wedding Gown
So, what was in the box? Three generations of wedding gowns, carefully wrapped in tissue: my client’s wedding gown from the 1970’s, her mother’s wedding gown from the 1940’s, and her grandmother’s gown from around 1910.
About the Design
Working within the confines of a 24″ wide by 36″ long size for the quilt, I needed to use the wedding gowns in a way that would visually feature and honor all three in some way. My client told me it wasn’t immensely important for her to be able to see her 1970’s gown in the finished quilt, but she really did like her braided belt. We agreed that her grandmother’s gown was the most interesting and should be showcased. Her mother’s gown was lovely and handmade, and had features I wanted to highlight.

1970’s Wedding Gown in the Box
To design this quilt, I used my Celebration Quilt worksheet to determine color, pattern, materials, techniques, and to make other design decisions. (If you own my book Creating Celebration Quilts or have taken this workshop, you have this worksheet.) While we quilters often think of quilts in terms of strips or blocks, I approached this quilt with layers as my goal. Each generation would have its own layer.
Layer One: Foundation from 1970’s Gown
My client’s wedding gown was made of a white knit, which gave me the additional challenge of stretchy fabric. To create a base layer for this quilt, I found an appropriate backing, added batting, and basted fabric from the skirt of the 1970’s gown to this quilt sandwich as if this gown were the quilt top. I grid-quilted it on my BERNINA 820 at 1 1/2″ intervals to keep the knit stable. Everything else in this quilt would be appliqued to this foundation.
Let me just pause for a moment and say how very hard it is to cut — yes, CUT — vintage garments. Here’s what I tell myself: This garment is beautiful. It lived a wonderful life and is now in a box where it gets no use, has no exposure, brings no joy. If I cut this garment and make it part of something else, it will have a new life where it will be seen and appreciated every day.
Layer Two: Background from 1940’s Gown

1940’s Wedding Gown in the Box
My client’s mother’s gown was really special. It was hand sewn from silk and lots of really lovely lace. I wanted to include it so that you could see it was still a dress, but there wasn’t enough real estate in this quilt to highlight both the 1910 gown and the 1940’s gown. I removed the lining from the 1940’s gown and auditioned several layouts that would show the bodice clearly. I also wanted to highlight the points at the cuffs.
Layer Three: Foreground from 1910 Gown
My client’s grandmother was tiny. Her wedding gown looks child-size. Every detail was well-preserved and, well, beautiful. I couldn’t fit the whole gown on the quilt (If I could have changed the quilt size at this point, I would have.) and I hated to lose any of the gorgeous lace detail. I started by removing the lining and then I positioned the dress on the quilt without cutting away anything. I tried placing it vertically, parallel with the sides of the quilt, but that made for a really boring composition. Then, I tried angling the dress to the right and to the left. The diagonal line made the quilt much more interesting and it left some room to the right to show off the 1940’s lace bodice.
Construction

Couched Floss in the Binding Ditch
Once I knew where everything would go, I pinned things firmly in place and then hand-appliqued everything to the base layer. Where there where big expanses of gown between the stitched edges, I followed the lines of the lace or construction and added more hand-stitching to keep things flat and secure. Once everything was in place, I trimmed the quilt to size and bound it. To add a little contrast between the binding and the quilt itself, I added a line of Aurifil’s new cotton floss hand-couched in the ditch. It’s subtle, but I think it was an important addition. Finally, I added my client’s braided silk belt. This was what she loved about her gown and I wanted it to show. I handstitched it across the top and left the ends to hang free, framing the other two gowns.

Out of the Box: Three Generations of Wedding Gowns
A Few Final Thoughts
When I make a Celebration Quilt for a client, I try very hard to use only the materials they supply. Everything in the quilt should be infused with meaning and memories. The only fabrics I added to this quilt were the binding, the backing, and the fabric for the printed labels.
Don’t forget the back of the quilt! When I have artifacts or leftovers that would not fit on the front of a Celebration Quilt, I try to make them work on the back. In this case, I used the lace points from the 1910 gown to highlight the labels. Because the quilt was somewhat unbalanced weight-wise, I added a second sleeve at the bottom for a thin metal slat or drapery weights to help the quilt hang perfectly.
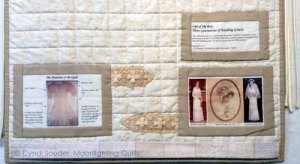
This quilt needed three labels to tell the whole story.
This quilt has three labels. One includes the name of the quilt and information about how it came to be. The second label includes pictures of all three brides, including names and dates. The third label includes the anatomy of the quilt, showing a picture of the quilt with arrows identifying what artifacts are where. This is a good idea any time the artifacts may not be obvious or the quilt may eventually go to someone who would not recognize the contents.
This quilt may not be for everyone; it’s not supposed to be. My client is happy. She has hung this quilt in her new home where she can enjoy it every day. An effective Celebration Quilt is personal and meaningful — and designed as a one-of-a-kind piece of art. If you are interested in learning how to make Celebration Quilts, you can buy my book or come to one of my workshops. If you bring the seed of an idea, I’ll help you make a plan. If you want to talk with me about making a Celebration Quilt for you, e-mail me and let’s start the conversation.


 All of the planning and all of the lists in the world will not actually get the work done. Writing won’t make it so. To obtain the almighty checkmark, you have to DO the work. That sounds so easy, but what if your body and mind are rebels, refusing to keep your butt in the chair or wandering off in search of more interesting pursuits?
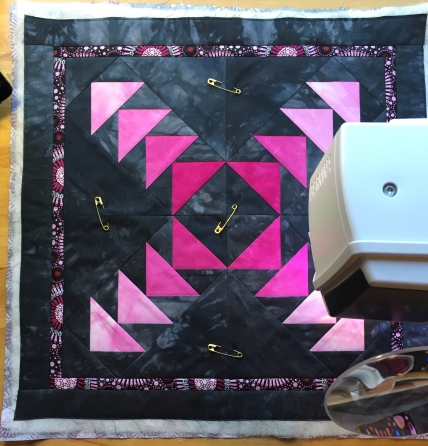 This quiltlet is a mostly-done sample for a new class I’m rolling out on paper foundation piecing at the


 For the rest of July, Cherrywood Hand Dyed Fabrics has a campaign at


